Thursday, January 31, 2013

January Roundup - NewFO Challenge

 2013NewFO

On January 1, my plan was to start one project this month, that being the baby quilt made from January's block of the month for our local quilt guild. This one is actually finished and ready to donate at our next guild meeting!

Then, one of the projects on my actual NewFO list for the year is a little angel quilt for a young Mom of an Angel.  I got as far as appliqueing the angel (inspired by a larger hanging created by Ulla of UllasQuiltWorld) and stalled right there, lettering is next plus some borders, a bit of  embroidery, quilting, binding, etc.  Progress to date on NewFO #2:

All those little leftover triangles cut from the corners of NewFO #1's snowball blocks became HST squares finishing at 1 inch.  Hopefully this little pile will soon become an Easter doll quilt for one of the granddaughters.  NewFO #3 as of yesterday:


Then out of the blue, Lori of Humble Quilts launched a quiltalong a couple weeks ago, and I could not resist trying my hand at this little vintage reproduction doll quilt.  NewFO #4 status:  pieced, hand quilted, bound and completed as of noon today - yeah!   This one was great fun, and satisfying to actually complete a hand quilted project in days rather than years!


A great start to the year, although I'm sure things will slow down considerably once I begin FMQ on stepdaughter's wedding quilt.

Linking up with Barbara at Cat Patches for the January NewFO Challenge, and looking forward to seeing how everyone else spent their January quilting hours.

Wednesday, January 30, 2013

Humble Abundance

As many of you know, Lori over at Humble Quilts has been  hosting a little quiltalong this past couple of weeks.  Her quiltalong features a sweet little vintage doll quilt from her collection, and her tutorials for making a reproduction of that piece.  You can see Lori's initial blog post announcing the quiltalong here,  and now Lori's linky party showing all the participating creations here!

Lori named her little quilt Abundance.   I've decided to call my rendition Humble Abundance, for a number of reasons, but let's just say the little cut-off triangle points are reason enough, lol!  Here it is in the initial stages.
While going through my bins of scraps I discovered there are very few pinks or light blues to be found!  Practically none, in fact, and most of the scraps were in ever-so-slightly-too-narrow strips.  I decided to use only fabrics from the scrap collection, and so only one fat quarter was cut into, that being the mustard colored print in the large outer triangles.  There were a number of browns and tans that seemed to compliment the mustard print so they were pressed into service as well.  My little quilt was pieced entirely on a 1950s Singer 301A, one of my favorite machines for piecing.  The 301 also did a great job attaching the binding to the quilt front, without the aid of a walking foot.  The pieced block:
And, here is the quilt after hand quilting and binding stitched down. 
I'm really looking forward to Lori's linky party next week and seeing how everyone else is creating their little Abundance!  Thanks for a great tutorial and quiltalong to Lori at Humble Quilts!

Next time I'll need to use this cute little machine for my piecing.  This is a Singer 28 from 1933, and it stitches beautifully.  A Mothers Day gift from my sweetie several years ago.


Monday, January 28, 2013

A New Year, A New Finish

This little baby quilt began life as a 'block of the month' for the local quilt guild I recently joined.  I figured since I was already so far behind with this year's blocks, I would just take each month's block beginning with January and turn it into a baby quilt for the local hospital's Layette Project which our guild supports.  The January block was a snowball/nine-patch combination.
Using scraps from my stash and a portion of two charm packs picked up from the Traveling Stash box, this little quilt for a special Easter baby was completed over the weekend, my first NewFO for the year.
I machine quilted this using simple meandering loop and flower and leaf motifs learned during the 2012 Free Motion Quilting Challenge sponsored by SewCalGal, using Aurifil 50 wt. cotton in both top and bobbin.  The back is another piece from my stash featuring lots of little ladybugs and tiny flowers.  Binding fabric is a light mottled batik with hints of most of the colors found in the quilt.
After cutting off all those triangles from the snowball blocks I just couldn't bear to throw them in the trash, so I'm thinking this little pile will become a doll quilt, in due time.  These little HST squares will finish at 1 inch.
Thinking babies this week ... my first baby was born 37 years ago today!  So hard to believe that many years have gone by ...


Saturday, January 19, 2013

Super Mail Call!

Yesterday's mail brought a huge surprise, and now I can tell you about it! As most of you know, SewCalGal hosted both a physical party in San Diego and a virtual Christmas Quilters Party as a benefit for Operation Homefront last month, and of course there were door prizes, raffle prizes and a Golden Basket prize for each party.    She had notified those of us who had won a raffle prize a couple weeks ago and gave us a list whereby we could indicate which of the raffle prizes we might be interested in, and she would try to match each winner with a desired prize.

So, yesterday I was expecting my regular Stash tea order from Amazon and when the mail lady drove up our long driveway and honked, I figured that was what had arrived.  But no, the tea is still nowhere in sight, but what did arrive was this huge priority mail box:
   containing all these delicious goodies!

Unbeknownst to me I had won the Golden Basket prize!  To say I was floored and amazed is an understatement!   So many generous sponsors donated prizes for the Quilters Christmas Party and a big Thank You! goes out to each and every one!  You can see SewCalGal's wrap-up post on the Quilters Christmas Party here and also watch for an upcoming post from SewCalGal announcing a Virtual Silent Auction also to benefit Operation Homefront!

It seems 2013 will be my year for learning several new to me quilting techniques.  I had already decided to learn machine applique.  Can you believe after 30 years of off-and-on quilting, I had never done any machine applique!  So, this past week another NewFO was begun, and this is my progress to date.  I found that machine appliqueing around all these pieces took a lot longer than expected, but isn't that always the case.
This will be part of a small piece I'm making as a gift for a young Mom of an Angel.  A quilted wall hanging created by Ulla Niemela of Ulla's Quilt World was my direct inspiration for this little angel.  Ulla creates an abundance of charming little angels, children, animals, etc. in fabric, some are freestanding dolls, some are ornaments, and others are quilted items.   Next I'll need to trim this panel a bit and add some borders, then the fun of free motion quilting it can begin! 

Now it seems I'll need to bite the bullet and learn English paper piecing!  Did you see among that prize package an entire kit and pattern for making a Night Blooms quilt?  Step one of the directions reads "you will need 48 copies of the paper piecing pattern page."  Yep, I'm gonna have to learn paper piecing!  Fortunately for me, the pieces aren't as tiny as some patterns I've seen, so this may possibly be doable even by someone as spatially challenged as yours truly!  I'll definitely print at least 50 copies of the pattern and make a couple practice blocks before cutting into this gorgeous Queen of the Night fabric collection!

There's also a book that came in the box Just around the Corner by Kari M. Carr that features mitered borders with inner scallops!  How cool is that!  These borders would lend themselves so well to baby quilts or as a perfect complement to a quilt with the allover FMQ feathers we've all been learning to do recently.  In the book she also demonstrates the Clearly Perfect Angles stitching template that clings to your machine and allows you to easily stitch perfect half-square triangles, flying geese, joining border and binding strips, etc.  There also just happened to be one of these magic templates included in the box!  More fun!

Well, that's the excitement from my little hillside corner of the world! 

Friday, January 18, 2013

My Mystery Batik

Last weekend we stopped by my favorite local thrift shop run by volunteers for the local humane society and this is what I found:
This wonderful batik is unsigned, but the pencil marks outlining the major elements before it was painted are still evident.  It measures approximately 18x12 inches.  The volunteer who sold it to me said she had bought "the other one" and it was similar in size and type.  She thought it might be Southeast Asian.  My first thought was to add some fabric borders and then free motion quilt it into a wall hanging.  But, before I do anything to it, I'd love to know more about its origin and approximate vintage!  After searching online and looking at several hundred images of art batiks I find nothing approximating this in style.  I'd love to hear any comments or leads you might have!

The local quilt guild I recently joined does a block of the month.  Each month we're assigned a different block and in the spring we have nine blocks and most of the participants make them into a baby quilt.  The major project of our guild is to supply quilts and receiving blankets to a local 'layette project' that provides gift baskets to low income new parents who might not have the means to provide everything needed for their new baby.  Since I just joined mid-year, I decided to turn this month's block into a baby quilt project.  So with a few pieces from my stash and a couple of charm packs chosen from the Traveling Stash box that visited here in November, this block
became this wild and colorful top.
I'm sure this top would have benefited from some solid sashing between the blocks but I didn't have enough of either the purple or light green to do that.  I should have this quilted and bound by February and then some Easter baby will have lots of dots and bunnies and ducklings to count!

Today's mail brought a wonderful surprise that I'll share in an upcoming post!  And that's about it for my week.  With any luck, we'll see the sun next week?!


Tuesday, January 15, 2013

Golden Quilter Awards and Memories of Survival

Have you noticed the new button on the right sidebar?  SewCalGal is hosting her 4th annual Golden Quilter Awards competition with nominations for a wide variety of quilting categories beginning today.  You can participate by nominating your favorites for each of the categories and later voting for your very favorites among all the nominees to choose the best-of-the-best for this year's awards.  For more information, go to SewCalGal's initial press release here, and the nomination process post with nomination linkies for all 12 categories can be found here.  It's easy, it's fun, and you could even win a prize from one of SewCalGal's wonderful sponsors just for honoring one of quilting's finest by your nomination and vote!

A few weeks back a Cheryl Lynch Quilts blog post included a story of her recent trip to Baltimore and The American Visionary Arts Museum to view an exhibit of the fabric art of Esther Nisenthal Krinitz entitled "Through the Eye of the Needle."  This body of 36 fiber art pieces was created by Esther in her later years, to tell her children the story of her childhood and survival of the Holocaust in Poland.   A link to a video interview with Esther is included in Cheryl Lynch's post.   Viewing the video, I was moved to learn more about Esther and her remarkable fabric art and purchased a copy of the book Memories of Survival and a video documentary Through the Eye of the Needle that tell Esther's story and provide detailed images of her fabric art which includes stunning crewel embroidery as well as hand and machine applique.  Esther in a wonderful naive folk art fashion depicts with simple beauty the countryside around her childhood home in rural Poland, contrasted with the stark reality of the time, the violence and terror experienced during the two years she and her sister evaded the Gestapo.   I hope to share copies of the book and video documentary with our local school district which each year invites one or more Holocaust survivors to the middle schools to share their experience with the students.  You can see the video interview with Esther Krinitz here and I'll include a photo of the cover of the book Memories of Survival below to provide a glimpse of her extraordinary fiber art.
Additional information is also available through the non-profit educational organization established by Esther's daughters at www.artandremembrance.org.

Tuesday, January 8, 2013

2012 Free Motion Quilting Challenge Retrospective

When I signed on for SewCalGal's 2012 Free Motion Quilting Challenge, I was wanting to get outside my comfort zone just a bit, having been a hand quilter for nearly 30 years, albeit intermittently rarely over the previous 10-12 years.  After retirement and getting back to quilting again I quickly realized the years had not treated my hands kindly as arthritis and occasional numbness in my fingertips made hand quilting much more difficult.  So, I decided to teach myself free motion quilting via a couple of books, and then thanks to the magic of the internet Leah Day's Free Motion Quilting Project and Diane Gaudynski's and Patsy Thompson's blogs showed the possibilities of using a home machine to create beautiful quilting designs. Still, I knew that it would take more than just looking at blogs and books to motivate me to become a better free motion quilter.  I needed a plan, structure, a commitment - and SewCalGal came along at just the right time, with her ingenious idea of this challenge!  I can't thank you enough SewCalGal, for YOUR commitment to make better and happier free motion quilters out of a whole lot of newbies!   I hope the fruits of your brainchild have exceeded your wildest expectations, because it has done just that for us!

I actually managed to complete all twelve monthly challenges as well as 3 of the 4 bonus challenges as of this writing!  You can see a summary of the monthly challenges here

It was only because of the FMQ Challenge that I was able to have my most productive quilting year ever!  Motifs and inspiration from the monthly tutorials can be found in nearly all of the 2012 finished quilts summarized here, with the exception of the first one which was completed very early in January.

So, what did I gain from this FMQ Challenge?   Beyond the obvious gift of having access to some of the most talented and creative free motion quilting experts' guidance during our monthly tutorials, it is a new knowledge and confidence that I can, with lots of continuing practice and perseverance, learn this new skill!   I've learned what type of free motion quilting comes naturally to me, and what does not!  I've learned a LOT about fabrics, threads and needles and how they can work with you or against you if you're not careful!   I even learned to leave my comfort zone even further and venture into the addiction world of blogdom! 

Last, but definitely not least, the gift of friendships made through the FMQ Facebook Group hosted by SewCalGal has led to other new blog acquaintances, some of whom were also working on the Challenge.  They in turn have introduced me via their blog links to yet another group of quilty bloggers from across the globe who share their  expertise via blog posts and video tutorials!   A recent illustration:  I first became aware of Rhianon Taylor's gorgeous work and her blog called The Nifty Stitcher early in 2012 through the FMQ Facebook Group.  
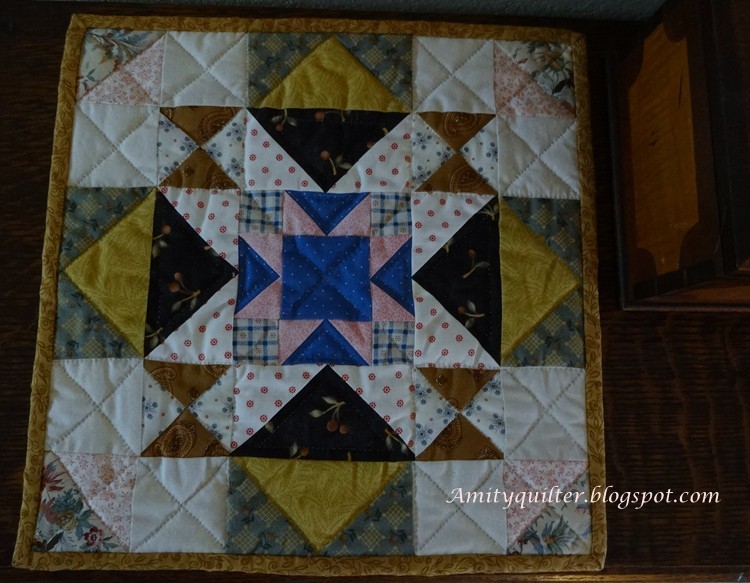
One of Rhianon's recent posts featured a sampler she created on beautiful pale blue satin quilted with a continuous line feather filler.   She was inspired to create this piece after seeing the blog and video of a quilter named Natasha who lives in Russia and who also creates her quilted masterpieces on a domestic sewing machine.  Rhianon's post included a link to Natasha's blog, and I must say I've watched the videos several times in the past couple of weeks trying to memorize her technique, as well as spending hours admiring her fabulous quilting posted on the blog.  I made my first attempt at replicating Natasha's method for the continuous line feathers on the outer borders of my Bonus Challenge #4 completed yesterday, shown below.
What fun!  No marking, no spine lines unless you really want them, you just start in one corner of your fabric and begin quilting feathers.  I love the way Natasha so effortlessly creates new branches wherever it seems appropriate, and keeps on going.  I definitely haven't mastered the branching off part yet!  I'm delighted to have this new (to me) method of quilting feathers to add to my arsenal of designs learned during the FMQ Challenge, and will keep practicing this technique every chance I get!  A direct link to Natasha's blog post containing the videos can be found here.

I'll be linking up with SewCalGal's Free Motion Quilting Linky Party, and hope you will head on over there and see what others have created using the tutorials provided by so many wonderful and generous quilting experts!   And, it's not too late to check out these great tutorials for yourself if you didn't have a chance to participate last year.  Nearly all of the tutorials are still available for use and you can find them by clicking on the 2012 Free Motion Quilting Challenge tab on SewCalGal's blog,  scrolling down to the chart containing the entire year's list of monthly tutorials, and then clicking on a highlighted month's link to be directed to that month's tutorial. 

Here's to a new year of quilting adventures!

2012 FMQ Bonus Challenge #4 - Teri Lucas

I was finally able to get back to the sewing machine over the weekend, and just finished up Bonus Challenge #4 by Teri Lucas for SewCalGal's 2012 Free Motion Quilt Challenge.  Teri's tutorial was all about creating great quilt designs in a kaleidoscope pattern from photos or clip art, using the software program Kaleidoscope Kreator 3.  Teri also provided a great sample feather design in pdf format for those participants who did not have access to the software program, and that is what I used for this sampler.

I'll say right at the outset that I made a LOT of mistakes planning and carrying out this project, as you'll soon see.  I printed the pdf design on Dritz Printed Treasures 200 thread count pima cotton.  This was the first time I had used this brand of inkjet printable fabric, and I was quite pleased with the color/print quality obtained.  Since the colors on the pdf were intense, the printer laid down a lot of ink and rendered the cloth almost canvas-like, even after rinsing and ironing.  The kaleidoscope feather design was quite small, and the heavy canvas-like print made quilting tiny even stitches nearly impossible for me.  Tried several sizes/types of needles but the sewing machine sounded like a machine gun going through the layers no matter which needle I used.  The stiffness of the fabric also left the design quite flat.  But we persevered and also quilted down all the blank areas around the feathers - more popping and banging of the machine.  First Lesson learned - I'll use this printable fabric again for photos, quilt labels, etc. but definitely will keep the colors less saturated and will only stitch in the ditch around the edges and NOT attempt to FMQ over the face of this fabric again!

Second lesson:  don't use a tightly woven sheeting for backing fabric just because you happen to have it, no matter how many times it has been washed!  Result:  large needle holes showing every stitch!

Third lesson:  don't try to make decisions or do precision FM quilting a few days after surgery when you're still in pain and/or on pain meds!  Definitely not optimal timing for any intricate or small scale quilting, witness the narrow borders, lol!  The variegated thread in the light green border was another bad decision, too much space between color shifts and they don't blend naturally in this type of design.

All that said, this morning I decided to just wing it with freehand feathers around the outer border, and had an absolute blast!    And here is what I ended up with.  No binding yet since I haven't decided how this might be used.


When time permits I'd like to try another method of transferring this design to a fabric with a softer hand and have another go at quilting the kaleidoscope star, which is really very pretty, and I think would make a great design for corner blocks on a large quilt.  A big thank you to Teri Lucas for sharing this tutorial with us and to SewCalGal for sharing insights on Kaleidoscope Kreator!  This software program looks like it will be a fabulous design option and I look forward to working with it sometime soon.  This tutorial turned out to be a great learning experience for me in so many ways, and that of course is what this challenge is all about.